


Discover a wealth of crafty inspiration within the May issue's floral gift
instructions
-
Summer Blooms, With Love, Special Day, Someone Special -
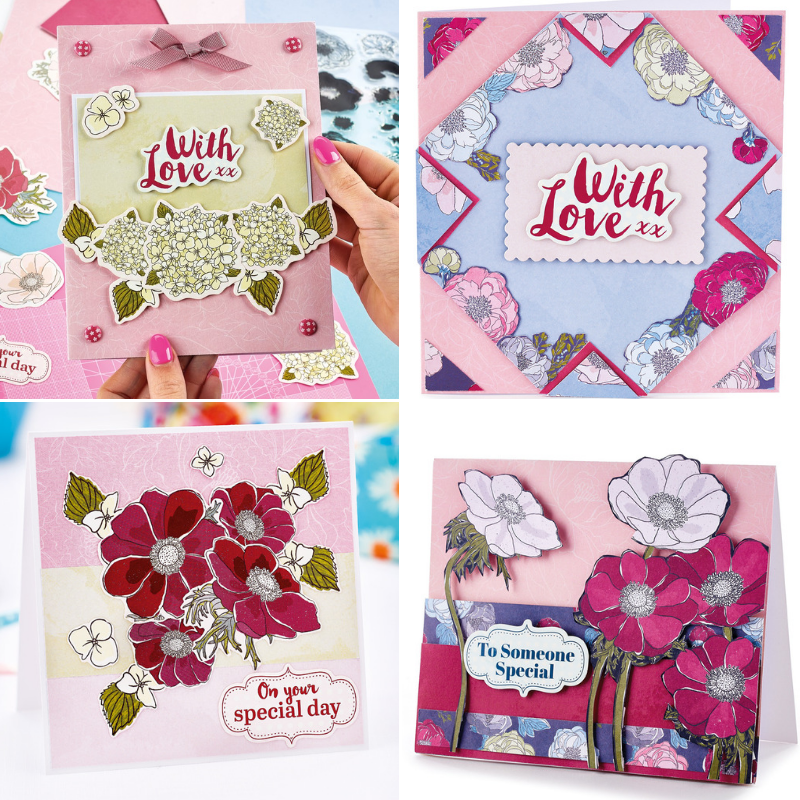
Summer Blooms
Create a white blank and cover with pink patterned paper. Cut a white rectangle from card and matt with pale green. Arrange the hydrangea die-cuts in a pleasing layout and fix in place using foam-pads.
With Love
Cut plain paper to a square, then angle to create a diamond shape in the centre. Trim edges so they are flush with the sides of the card. Cut flowers from patterned papers, then trim in half so they have a straight edge. Fix to the middle square, creating a pretty border. Make four triangles of a plain dark paper and four of patterned paper a little smaller so they can be layered on top of the plain ones. Stick down with foam squares to the corners of the inner diamond layer. Stamp ‘With Love’ on top of a handmade frame.
Special Day
Layer strips of leftover card from the kit to make a panel, 14cm square, and fix to a 14.5cm square blank. Make up a bouquet with die-cut flowers in the centre using the large red ones and small cream flowers/leaves, add highlight to the centres. Attach the sentiment die-cut to the lower right corner.
Someone Special
Create a pink patterned card in a landscape format. Choose patterned paper and a complimentary plain paper. Cut down to half the size of the background card.
Position the papers in the bottom half of the card, layering the patterned one first, then the plain section next and fix with foam pads. Finish with a panel of patterned paper. Cut flowers and arrange as required using foam pads. -
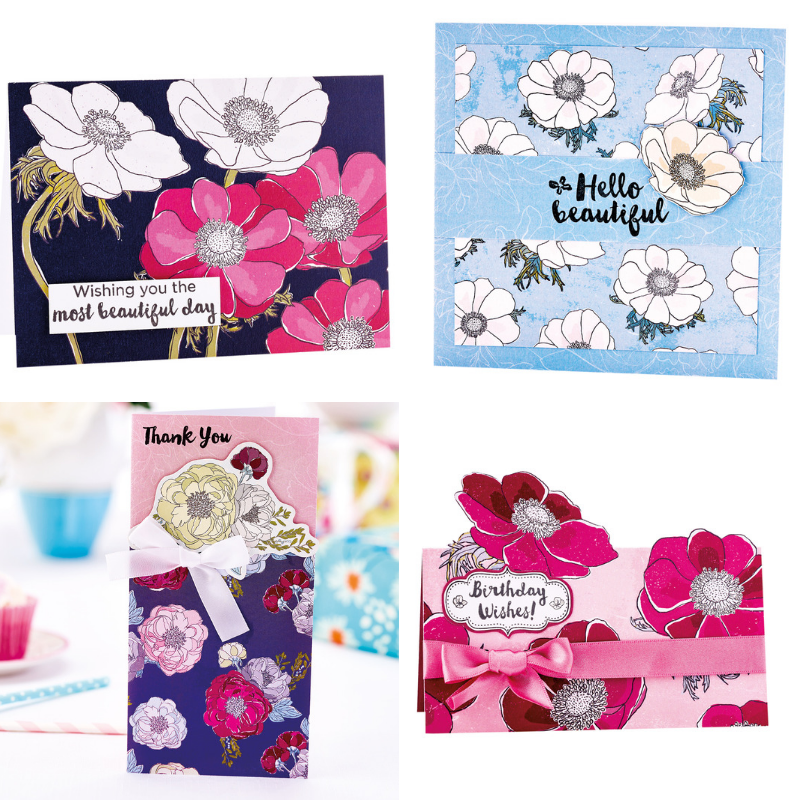
Congratulations, Hello Beautiful, You Are My Sunshine, Thank You -

Congratulations
Trim blue patterned paper into a square and glue onto a card blank. Cut a strip of flower paper, mount onto card and glue across. Die-cut a circle from white card, then a scallop circle from peach and glue together. Attach three flower die-cuts onto the circle. Stamp the sentiment onto card, secure in place and add pearls to finish.
Hello Beautiful
Die-cut white card using a stitched square die and mount onto blue. Attach a strip of black and white striped paper. Stamp the flower and leaves building up the layers using black, pink and green inks. Add three gems to finish.
You Are My Sunshine
Create a blue card using a background die and mount onto yellow. Die-cut three circles from white and three scallop circles from yellow. Fix in place with foam-pads so they overlap. Stamp the small flower three times using black and yellow ink. Cut out each one and fix onto the circles. Stamp the sentiment, mount onto card and secure with foam pads. Add three pearls to finish.
Thank You
Trim patterned paper into a square and attach a ribbon across the top. Mount onto pink card and fix to a blank. Stamp the flower and leaves using black, building up the layers with green and pink ink. Position a sentiment and label onto white card, cut out and fix in place. Add a ribbon bow and pearls to finish.
-
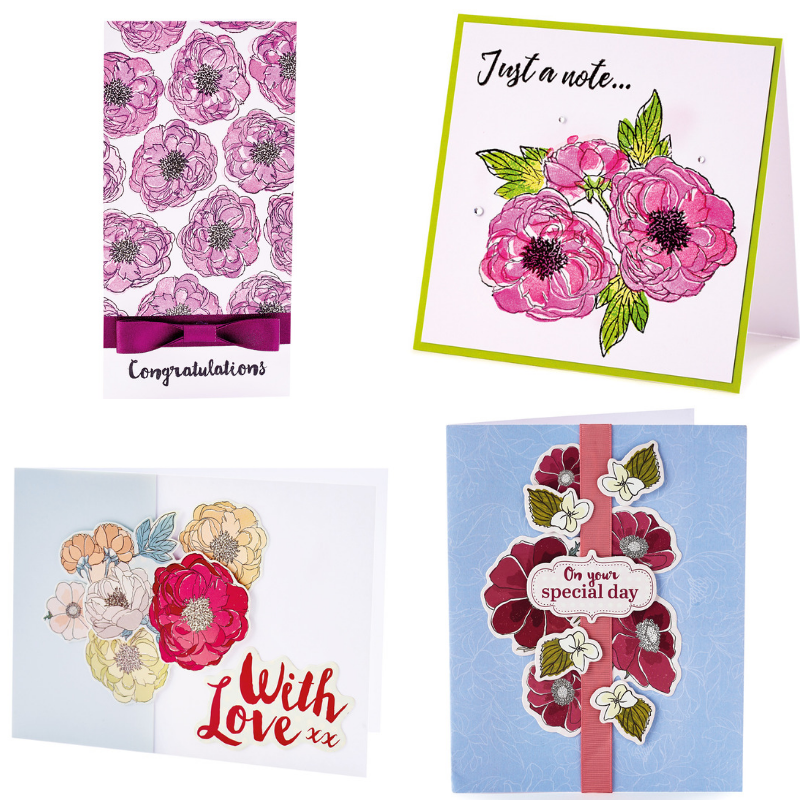
Flower Medley, Beautiful Flowers, Tall Floral, Red Blooms -
Flower Medley
Cover a top-fold landscape blank, 10cm x 14cm, with a section of the red/white/navy floral card. Stamp the sentiment onto white card and trim. Fix to the lower-left corner with foam tape and add gel highlight to the flower centres.
Beautiful Flowers
Trim a blue blank, 15cm square. Cut blue floral card, 13cm square, and attach centrally to the blank. Trim a scrap of card, 3.5cm deep, and fix across the centre. Stamp the sentiment onto this panel and add a die-cut pale pink flower to the right of the sentiment. Apply gel highlighter to the die-cut flower centre.
Tall Floral
Trim a pink blank, 9cm x 18cm, cover the bottom 12cm with a light purple floral card. Fix the triangular shaped bouquet over the join with foam tape. Attach a white ribbon and stamp the sentiment in the top-left. Highlight the centre of the die-cut blooms with glitter.
Red Blooms
Trim the red poppy card, 14cm x 15cm, then score across the centre only, up to the flower images. With the card flat, use a sharp craft knife to carefully cut around the tops of the flowers, only up to the score line. Fold the blank so that the cut sections of the flowers stand up. Highlight the centre of the flowers with gel pen. Stamp the sentiment and frame, then cut out and matt onto leftover card. Wrap and tie ribbon around the base of the blank. -
Purple Blooms, Just a Note, With Love, Pretty Posy -
Purple Blooms
Stamp large flower layers randomly over white card, 9cm x 15cm, omitting the centre of the flower. Add gel highlights to the centre of each flower. Matt the stamped panel to the top of a blank, 9cm x 18cm. Stamp ‘Congratulations’ centrally at the bottom and cover the join with ribbon and a matching bow.
Just a Note
Following the layer numbers, stamp a small bouquet of flowers in pinks and greens. Trim to a 10cm square so the bouquet sits more in the lower-right corner. Matt onto a blank, 10.5cm square, covered with lime card. Stamp a sentiment in the top-left and finish with gems.
With Love
Create a side-fold landscape blank, 10.5cm x 14cm, and cover with pale blue card, 6cm wide. Attach the ‘With Love’ die-cut in the right corner. Make a small bouquet just above the top-left of the sentiment with flowers, layering using foam tape.
Pretty Posy
Cover a white portrait card blank with blue patterned paper. Pop out the red poppies from the die-cut sheet and arrange down the centre of the card front. Trim grosgrain ribbon to size, then stick over the middle of the flowers as shown. Finish with small hydrangea die-cut shapes and a sentiment label. -
Want to see what else is inside the brilliant May issue of Crafts Beautiful? Take a look right here!


Projects you may also like...


Recommended Projects...
 Crafts Beautiful Edition


