The bears are back in town! Looking all cute and cuddly just in time for your Christmas creations
What you need...
- Papers, Polar Expressions, Imaginisce
Stamps, clear, Polar Expressions, Imaginisce
Card: blue, pink, brown, green
Blanks, white
Twinkling H2Os: blue, pink, brown, green
Crystals, assorted
Ribbon, trimmings, Polar Expressions
Glitter glue, crystal
Ink-pad, pinecone
Punch, large scallop-edged circle
Circle cutter
Jump ring
instructions
-
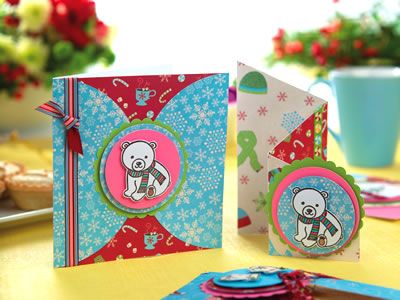
Square Bear - 1. Take a 14cm square blank and cover with red patterned paper. Trim a large circle from snowflake paper, cut in half and stick to the front of the card using double-sided tape.
2. Add striped ribbon vertically down the left of the card, securing the ends on the inside. Tie an additional length at the top and trim the ends at angles. Stamp a polar bear onto white card with pinecone ink and clear emboss. Add colour to scarf and paw using twinkling H2Os.
3. Punch a large scallop-edged circle from green card and cut two smaller ones from snowflake paper and pink card using a circle cutter. Matt the green circle onto the centre of your greeting with double-sided tape then layer on the snowflake and pink circles using 3-D foam pads. Add the polar bear on top and finish by applying crystal glitter glue to the snowflakes in the background. -
Bear Card (diagonal) - 1. Take half an A6 blank and, in landscape position, score two vertical lines at 7cm and 14cm. Fold to create a concertina card as shown. Cover the first and third panels with the scarf and mitten patterned paper.
2. Adhere a constrasting sheet to the middle section and add green ribbon vertically along the edge, securing the ends around the back using double-sided tape. Punch a large scallop-edged circle from green card and two smaller circles from pink card and snowflake patterned paper. Matt and layer onto the front panel using 3-D foam pads.
3. Stamp a polar bear onto white card using pinecone ink and clear emboss. Trim and add colour using twinkling H2Os. Once dry, adhere to the centre of the snowflake circle and add glitter glue to complete. -
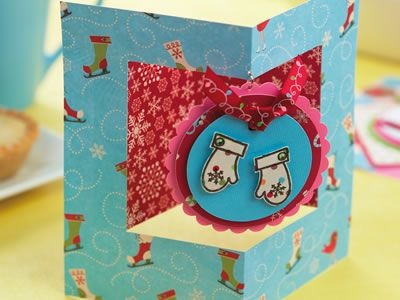
Mittens Card - 1. Take patterned paper, 15cm x 19cm, and cut out a section from the middle, 8.5cm x 12cm. Score a vertical line down the centre and fold into position. Trim burgundy snowflake paper, 8.5cm x 16cm, and score vertical lines at 2cm, 8cm and 14cm. Fold and stick the two ends to the outer edges of the back of the aperture using double-sided tape.
2. Punch a large scallop-edged circle from pink card and trim two further circles from patterned paper and blue card using the cutter. Add a hole to the blue circle and tie red ribbon through. Matt and layer all the elements together using 3-D foam pads, then punch a tiny hole in the top of the pink circle.
3. Stamp mittens onto dotted paper using pinecone ink and clear emboss. Trim around the design and mount onto the layered circles with dimensional adhesive. Punch a tiny hole in the centre of the card top and join the matted section to the greeting using a tiny silver jump ring, as shown. To finish, hot-fix a green crystal to each mitten and add glitter glue to the snowflakes in the background. -
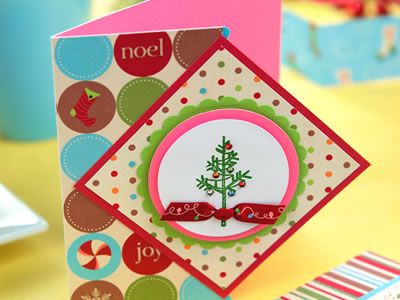
Festive Tree - 1. Create a white blank, 14cm square, and trim half off the front. Cover the remaining section with circle patterned paper. Cut a strip of blue card with scallop-edged scissors and stick on the inside of the card front to create a border.
2. Trim a circle from white card and stamp a tree image onto the centre using green ink before clear embossing. Punch a small hole on either side of the tree trunk and pull red ribbon through. Cut a larger circle from pink card and punch a scalloped edged one from green. Matt and layer them together using 3-D foam pads.
3. Cut a large square from dotted paper and mount onto burgundy card leaving a visible border. Adhere this to the middle of the card front using double-sided tape, as shown. Attach the circle topper in the centre and hot-fix crystals to the tree. Trim pink card to fit then add to the inner section to complete.
Patterned papers, clear stamps, and ribbon trimmings, Polar Expressions collection by Imaginisce, Mod Scraps, 0117 9327 695, http://www.modscraps.co.uk
Twinkling H2Os, Sir Stampalot, 01733 324 007, http://www.sirstampalot.co.uk
Large round scallop-edged punch, Woodware, for local stockists see, http://www.woodware.co.uk


