


Pack up a suitcase and head off on a crafting adventure with Keren Baker's travel set
What you need...
- Cardstock: kraft, white, yellow, light blue, dark blue, light green, dark green, light brown, dark brown
Patterned paper, Carta Bella, Let’s Cruise
Stamps, Tonic Studios, Jetsetters Passport set one and two
Dies: Tonic Studios, London Landmarks; New York Landmarks; Ornate Metro Sign; City Skyline; Travellers Luggage; Nested Circles
Inks: Nuvo Hybrid, Tonic Studios, Black Shadow; Red Poppy
Gold elasticated twine
White gel pen
Plain notebook
Adhesives
instructions
-
Bon Voyage Card -
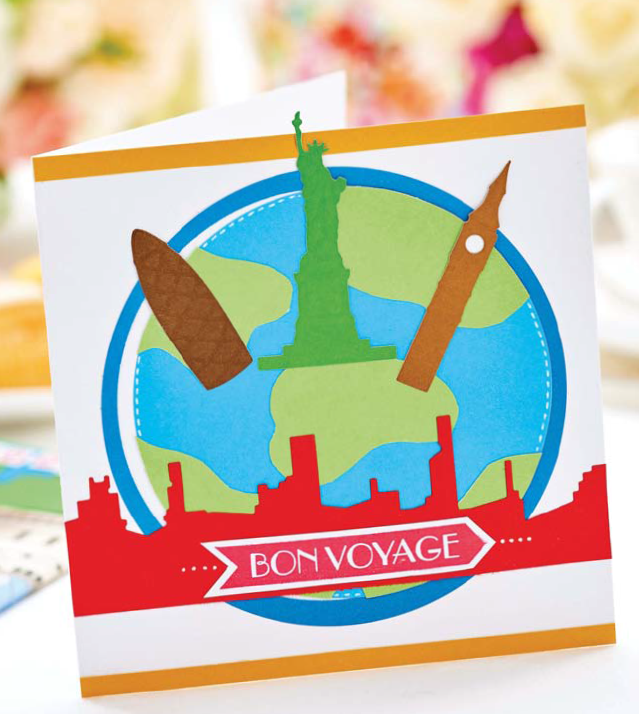
1 Create a white card base, 12.5cm square. Die-cut a dark blue circular frame and a small light blue circle. Cut out land shapes and adhere to the circle, then secure the globe onto the blue frame. Die-cut and emboss travel landmarks in different coloured card, then attach to the globe before affixing to the card base.
2 Stamp a sentiment onto white card using red ink and die-cut a skyline in red cardstock, then add centrally to the card base. Secure strips of yellow cardstock to the top and bottom of the card and add white gel pen details on the globe to finish.
-
Journey Journal -
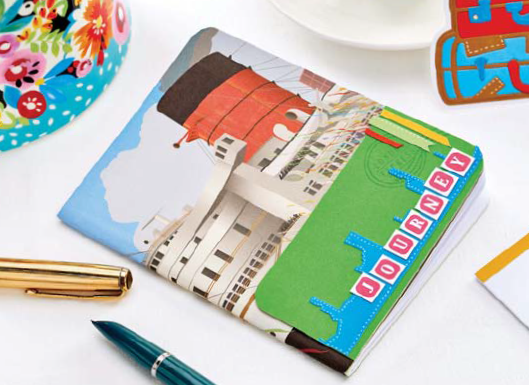
1 Wrap and adhere patterned paper to the front of a plain notebook. Cut a rectangle the same width as the notebook, then make a curved top left edge. Secure to the front using adhesive on the right and bottom edge to make a pocket.
2 Stamp a sentiment in red ink onto white card and trim out each letter. Die-cut a skyline from blue cardstock, mark a dotted outline with white pen and add to the pocket. Trim out thin strips of cardstock and adhere to the right-hand side. Stamp a postage mark, then add the cut-out letters to the front.
-
Passport Cover -
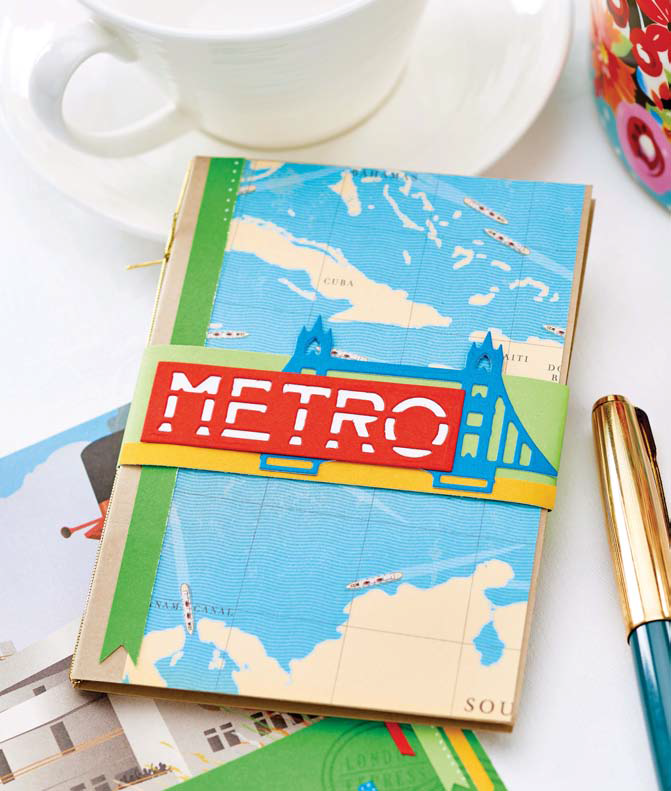
1 Measure a passport, then create a folded piece of kraft cardstock slightly larger than the cover. Glue patterned paper to the front, then a strip of green cardstock to the left, before securing with gold elasticated thread.
2 Wrap green cardstock around the cover and adhere the ends together so the wrap can slide on and off. Add yellow cardstock to the bottom of the wrap. Die-cut a bridge from blue card and a metro sign from red card. Secure white cardstock behind the metro sign. -
Luggage Tag -

Die-cut the luggage tag die from different coloured cardstock, then paper piece onto white cardstock. Trim out the edge around the tag shape and punch a hole in the top. Add a thin strip of yellow cardstock through the hole, then add details with white pen.


Projects you may also like...


Recommended Projects...
 Crafts Beautiful Edition


