
Project
Create a Sixties Style Collection Necklace
- Designer: Ellen Kharade
- Tags:
- jewellery making, jewellery,


Use polymer clay and resin to recreate Ellen Kharade's faux mokume gane effect
What you need...
- INGREDIENTS Necklace, Pink crystal beads, 8cm x 4, Fimo Soft polymer clay, tangerine, raspberry, plum, Metallic gold flakes, Pebeo Accessories Fantasy oval bracelet,Loose chain 26cm,Jump rings, 5mm,Bolt clasp, Head pins
TOOLS Pliers, round-nosed, flat-nosed, chain-nosed, Chemset Standard resin ES 8102, Chemset hardener ES 8203, Digital scales, Mixing cup, Lolly sticks, Barrier cream, Clay roller, Glass or ceramic tile, Tissue blade, Assorted clay tools and small cutters
instructions
-
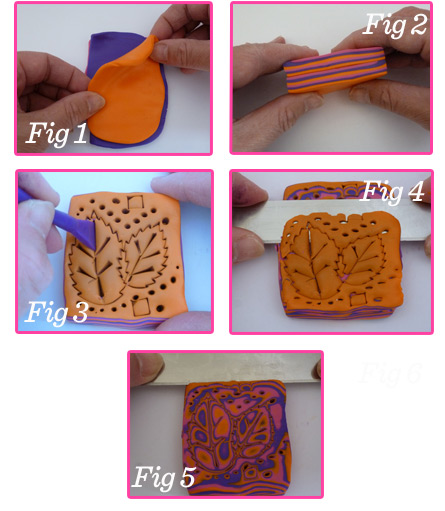
Necklace - 1. Condition a quarter of a block each of three polymer clay colours and roll into thin rectangular sheets. Lay the sheets on top of each other in this order: tangerine, plum and raspberry to create a colour pattern similar to the one shown (Fig.1). Give each sheet a roll to expel any air bubbles, then trim again so they are all the same size. Cut the rectangular sheet in half and stack on top of each other (Fig.2).
2. Press the clay block firmly onto a glass or ceramic tile to stop it from moving around. Press various cutters and tools into the clay, as far as they can go. Use pens and needles in various sizes and press deep into the clay to create a pattern (Fig.3). Use a tissue blade to carefully slice off thin veneers of clay (Fig.4). Continue slicing through the stack, as each layer will produce a different pattern with colour variations (Fig.5). Lay each slice on a piece of greaseproof paper and put to one side.
3. Roll out a thin sheet of plum clay, place the patterned veneer sheet on top and roll until both pieces have fused and the pattern has spread and appears like traditional mokume gane. Make a card template to fit the bezels in a bracelet blank. Choose the best patterns in the clay, place the template on top and cut out five pieces with a scalpel. Gently lift the pieces off the tile and place into the bezels, smoothing the clay to the edges with your finger for a perfect fit. Add a few gold flakes and bake according to the manufacturer's instructions.
4. Cover your work area with newspapers and apply barrier cream to your hands. Place a mixing cup on a set of digital scales and zero them, then pour in 15g of resin and 7.5g of hardener to create 22.5g of resin in total. The resin is always mixed by weight: two parts resin to one part hardener. Stir the resin carefully with a lollipop stick, scraping down the sides of the pot as you do so until well combined.
5. Leave the resin for 20 minutes to thicken up. Carefully apply a small amount to each bezel, taking care not to overfill them then cover with a bowl and leave to dry out overnight. Any cured resin that has dripped over the bezel can be pared away with a scalpel. Thread four pink crystal beads onto individual head pins, trim the ends to size and turn into neat loops. Attach to the links in between the bezels. Cut 26cm of chain in half and attach to either end of the bracelet. Add jump rings to the chains and a clasp to finish.
-
Make it yours - Create matching earrings by making up two individual bracelet bezels with mokume gane clay and resin, then attaching earwires.

Projects you may also like...


Recommended Projects...
 Crafts Beautiful Edition


